Refinishing hardwood floors is a great way to restore their original beauty and lustre. Scratches, gouges, and nicks can make hardwood floors look worn and aged, but with the right know-how and elbow grease, they can be refinished at home. Knowing the process of refinishing a hardwood floor can help determine whether to refinish or replace it. This guide will cover each stage of the hardwood floor refinishing process, from evaluating if it is the right solution to applying the last layer of the finishing product.
7 Things to Consider Before Refinishing Your Hardwood Floors
Refinishing hardwood floors can be a great way to update the look of your home. It can also be an economical and easy project for homeowners who want to give their floors a fresh new look. Before beginning the refinishing process, there are seven things to consider.
First, you should determine your budget for the project. Second, assess the condition of the floor and decide if sanding and staining are necessary or if it just needs a new coat of sealant. Third, decide on the desired finish – glossy or matte. Fourth, identify what type of wood is used in your flooring. Fifth, check to see if there is an existing sealant that needs to be removed before applying a new one. Sixth, measure the size of the room so you know how much material you need for the job. Finally, make sure there is adequate ventilation in order to avoid any health risks from fumes created during refinishing.
Once all these considerations have been taken into account, you can begin the refinishing process. Start by sanding the floor to remove any existing sealant and prepare it for staining. Next, apply a wood stain or sealer to protect and enhance the natural colour of the wood. Finally, apply a finish – oil-based polyurethane, water-based polyurethane, or wax – and allow it to dry completely before walking on the floor. With patience and attention to detail, you can refinish your hardwood floors and give them a beautiful new look.
Refinish or Replace Your Hardwood Floors?
Refinishing hardwood floors is often a more cost-effective option than replacing them. The process of refinishing involves pulling up the shoe base moulding, rough-sanding, screening sand and removing all dust from the floor, and then applying wood stain and finish to complete the refinishing process. This is much cheaper than purchasing new wood and paying for labour to remove the old wood. Refinishing can also be used to update hardwood floors that have become dull or scratched over time.
The cost of refinishing hardwood floors varies depending on the size of the area being refinished, as well as any additional services such as staining or sealing. However, it is generally much cheaper than replacing hardwood floors altogether. Additionally, refinishing can be done in a fraction of the time it takes to replace them, making it a great option for those who need their floors updated quickly and affordably.
Step-by-Step Guide to Refinishing Hardwood Floors

1. Prepare the Floor for Refinishing
Preparing a floor for refinishing is an important step in the process of restoring its beauty and lustre. Before beginning, it is important to move all furniture and rugs or carpeting out of the room. Any protruding nails should be hammered down and lose floorboards secured. The floor should then be vacuumed or mopped to remove any dirt or debris. To reduce dust emissions, rent equipment such as drum sanders and edger sanders. Holes can be filled with wood putty or wood filler, and spot tests of the stain or finish should be done before applying a coat. Felt pads should be placed on furniture feet to avoid dragging them across the floor when returning them to the room. Hardwood floors can typically be sanded up to 10 times for refinishing purposes, but oil-soaked rags must be stored and disposed of properly to avoid fire hazards. For small projects, tool rental may also be considered as an option. Alternatively, The Home Depot offers professional hardwood floor refinishing services.
2. Patch and Repair
Patch and repair are important parts of maintaining a wooden floor. It can help to keep the floor looking its best and prevent further damage from occurring. The first step in patching and repairing a wooden floor is to check for any larger holes or cracks that need to be filled. Wood filler or trowel filler can be used with a spackle knife or large putty knife, depending on the severity of the damage. After filling the holes, it’s important to wipe down the floor with a damp rag to remove all debris and dust before sanding.
When filling gaps between floorboards, it’s best to do so during summer when humidity is higher as wood compresses during winter and expands in summer. Only fill larger gaps; leaving smaller ones unpatched will accommodate wood expansion. If done correctly, patching and repairing your wooden floors can make them look like new again!
3. Sand the Floor
Sanding a hardwood floor is an important step in restoring its beauty and lustre. It eliminates scratches, stains, and discoloration, but may not be able to fix deep gouges or patches. To get the best results, it’s important to use the right tools and techniques.
Rent a drum sander from a home improvement store and practice on the plywood before using it on the floor. Use 40-grit sandpaper to sand in 3-4 foot sections, overlapping rows by one board. An edge sander with the same grit sandpaper should be used to sand up to the walls. Vacuum and wipe the dust from the floor between each step, then repeat the process with 60, 80 and 120-grit paper for a professional-quality finish. Replace the abrasive belt after sanding 250 square feet and sweep/vacuum between sanding with different grades of grit for optimal results. With patience and care, you can restore your hardwood floors to their original beauty.
4. Buff the Floor
Buffing a floor is an important step in creating a smooth, professional-looking finish. It can be done with either an industrial floor buffer or a pole sander, and the process involves sanding with different grits of sandpaper. Start by using a 120-grit sanding screen to move back and forth with the grain of the wood. If you are unfamiliar with this process, it is recommended to rent a drum sander from a home improvement store and practice on the plywood before using it on the floor. Once comfortable, begin by sanding the floor with 40-grit paper in 3- to 4-foot sections, making sure to empty the dust bag regularly. Use an edge sander for the edges of the room as well, also using 40-grit paper until the floor colour is uniform. Vacuum and wipe the dust from the floor between each step, then repeat the process using 60, 80 and 120-grit paper for a professional-quality finish. With patience and care, you can restore your hardwood floors to their original beauty.
5. Apply the Wood Stain
Applying wood stain is an important step in preserving and protecting hardwood floors. The right type of stain should be chosen based on the desired colour and type of hardwood flooring. To stain, use a foam applicator pad in the same direction as the wood grain and work on one area at a time. Excess stains should be removed with clean cotton cloths or paper towels before allowing them to dry. For best results, apply the stain evenly by applying it to one small area at a time and wiping off any excess with a rag. Oil-based stains stay workable longer than water-based, so they are better suited for larger areas.
It is also important to avoid letting the leading edge of your job dry, as this can cause lap marks (stripes). When applying wood stain, it is best to start from one corner and work your way outwards in manageable sections. This will help ensure that all areas are stained evenly and without any streaks or lap marks. Once the stain is dry, apply a sealer to protect the floor from dirt and wear.
6. Apply the Finish
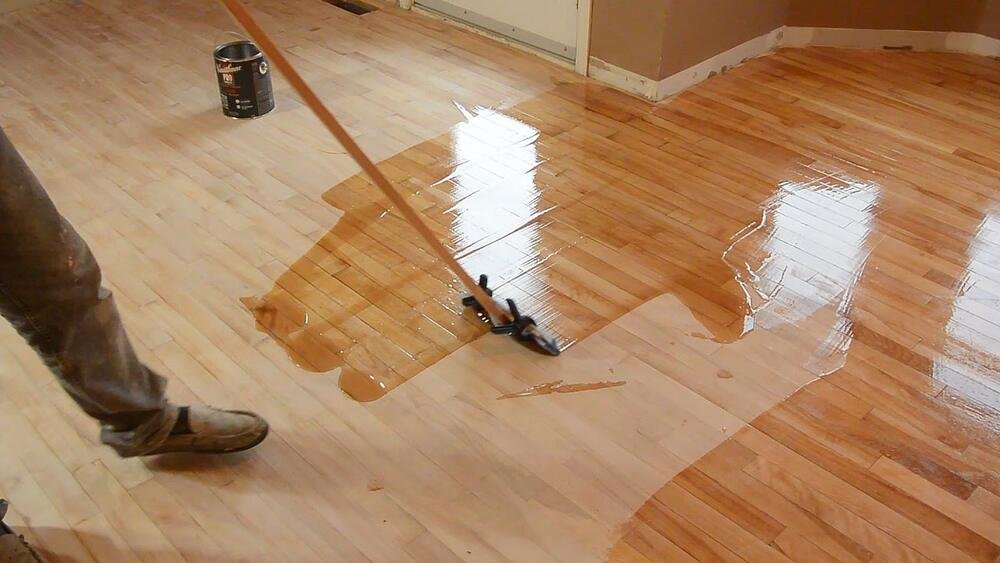
Applying a protective coat of wood finish is an important step in preserving the beauty and durability of hardwood floors. When selecting a finish, it’s important to consider factors such as drying time and fumes. Oil-based finishes require three coats, while water-based finishes need four coats. Sand lightly between each coat and vacuum up the dust before applying the next one. A lamb’s wool applicator should be used to apply the finish in smooth, even lines while avoiding drips.
Refinishing a hardwood floor is a lengthy and labour-intensive process that requires professional expertise. It’s best to find local contractors online using services like Yelp or Angi. Before deciding which contractor to use, read all of their reviews carefully and message the person who left the review for additional information. Additionally, check the Better Business Bureau for complaints and read how they were resolved. Make sure that the contractor is bonded, licensed, and insured to work in your area by asking for proof of these documents.
7. Seal the Floor
Sealing hardwood floors with polyurethane is an excellent way to protect them from water, scratches and dings. It is the most popular option for sealing hardwood floors and comes in two varieties: oil-based and water-based. Each type has its own pros and cons, such as colour, application time, and drying time. Applying polyurethane requires a high-quality brush or wool applicator to ensure an even finish without bubbles. To apply the sealer, use a smooth sponge roller working in small sections with the grain of the wood. Allow for plenty of drying time between coats, 24 hours before walking on the floor and 72 hours before replacing rugs or furniture. After applying the final coat of polyurethane and letting it dry, use at least two coats for oil-based products and three for water-based products. Finally, reinstall the trim to complete the project.
Sealing hardwood floors with polyurethane is an important step in preserving the beauty and durability of your hardwood floors. It requires careful application and plenty of drying time, but the results are worth it. With a few simple steps, you can protect your hardwood floors from water damage, scratches, and dings for years to come.
When to Call a Professional
When it comes to refinishing hardwood floors, it is best to leave the job to a professional. Refinishing can help extend the life of your floor up to 10 years if well maintained. However, if the floor has severe damage such as warping, major chips, termite infestation or serious staining, refinishing will not help much and the boards should be replaced. In this case, it is necessary to call a professional for advice and assistance.
Before calling a professional, there are some inexpensive alternatives that you can try first. For instance, you can fix minor scratches with sandpaper or buffing with hardwood floor polish and mop. You can also rent a floor polishing machine at a home improvement store. To determine if refinishing is needed, put a few drops of water on the floor — if it beads up, the floor just needs buffing.
Summary
Refinishing hardwood floors is an important step in preserving the beauty and durability of your floor. It involves sanding, staining, sealing with polyurethane, and trim reinstallation. When selecting a finish, it’s important to consider factors such as drying time and fumes. Applying polyurethane requires a high-quality brush or wool applicator to ensure an even finish without bubbles. For serious damage, it is best to call a professional for advice and assistance. With proper care and maintenance, refinishing your hardwood floors can help extend their life up to 10 years.
Also Read: Sanding And Refinishing For Old Wood Floors – Tips You Need


