Thermopile devices are commonly used in heating devices such as gas furnaces, water heaters, and other heating appliances. Sometimes, you may notice that the devices connected is not working properly and have trouble heating water or igniting. These symptoms indicate malfunction due to low thermopile voltages.
Low thermopile voltage issues are due to cold junction errors, loose wires, faulty internal units. Additionally, the location of your device such as windy area can also develop such voltage issues.
Before fixing the Thermopile, you must know meaning and working process of the thermopile. In this article, we go through main aspect that develops this low voltage issue. Besides, we give you a step-by-step approach to fixing the Thermopile voltage low problem. Otherwise, an expert technician is great option.
What Does Thermopile Voltage Low Mean?
Thermopile voltage low occurs when the unit unable to convert thermal energy into electric energy. Indeed, Thermopiles use heat to generate voltage and deliver it to the heating appliances.
The pilot light heats up the Thermopile in a water heater to produce electricity. This unit connects multiple thermocouples in series or parallel formation. The electricity is made from the temperature difference between the two conductors.
Thermocouple produces voltage and delivers it through the gas control valve when the burner is turned on. The appliances don’t heat or start the ignition if the current is below a certain level.
Additionally, If the pilot light is turned off, Thermopile does not produce electricity and shuts off the gas control valve. So the mechanism relies on the pilot light and temperature difference to generate enough current for heating devices.
In short, Thermopile offers output in terms of temperature, which is required for water heaters and other heating appliances. Temperature differences between two conductors are vital in the process of Thermopile voltage. So check out the reasons why your Thermopile is running at low voltage.
Why is the Thermopile Voltage Low?
Modern heating appliances include indicators to ensure continuous internal function. LEDs will pop up if your water heater or fireplace Thermopile runs low voltage. Now various factors depend on this occasion.
Old or Bad quality Thermopiles primarily develop the issue on working days. Additionally, some ordinary occasions can also trigger low voltage in these units. For example, high winds can extinguish the pilot system and influence the voltage production in thermophiles.
Besides falling chimney caps and the water heater’s bottom drafts can also cause problems. So first, make sure the unit is free from these uncertain influencers. After that, you inspect the Thermopile if there is any technical fault.
1. Cold Junction Issue
Cold junction is a process in Thermocouple located under the Thermopile unit. This electric device contains two junctions, hot and cold. Hot junction contacts to the device you want to measure for temperature (water heater, fireplace etc).
Another part is a cold junction that is not in contact with any device but helps keep a constant temperature (similar to room temperature). Now voltage output or electricity of a Thermopile relies on the temperature difference between the cold and hot junctions.
If the cold junction is not aligned with room temperature, errors can occur. Indeed, the cold junction error develops if the surrounding is too cold, the Thermocouple length is short, and blockage in the heat flow.
2. Loose Wire Connection in Thermocouples
Thermocouples include multiple wires connected to them. Loose or damaged in these wires can cause low voltage in your Thermopile. Thermocouples are generally attached with two metal wires from one end.
Now there are multiple Thermocouples available in the Thermopile. Their distinct metal joints produce more accurate voltage using the temperature difference between two junctions.
Whenever the pilot light heats the Thermocouples, metal wires generate a thermoelectric current to pass through the gas control valve. Low voltage problems will develop if the wiring is damaged or loosely connected.
3. Damage to the Unit
Technical error is the Final reason for low thermopile voltage. It is common with old or damaged Thermopile units where Thermocouples wires or metal terminals get damaged. As a result, the unit doesn’t function as regular days.
If your electric Thermocouple has the same problem, you should replace the unit with a new one.
How to Fix Thermopile Voltage Low?
If the Thermopile is not damaged or defective, you can follow a certain fixing process, available for low voltage. We should review the testing process to ensure the current passes through the unit. Secondly, we check cold junction is not the issue in your device. Similarly, we explain other fixes for low thermopile voltage.
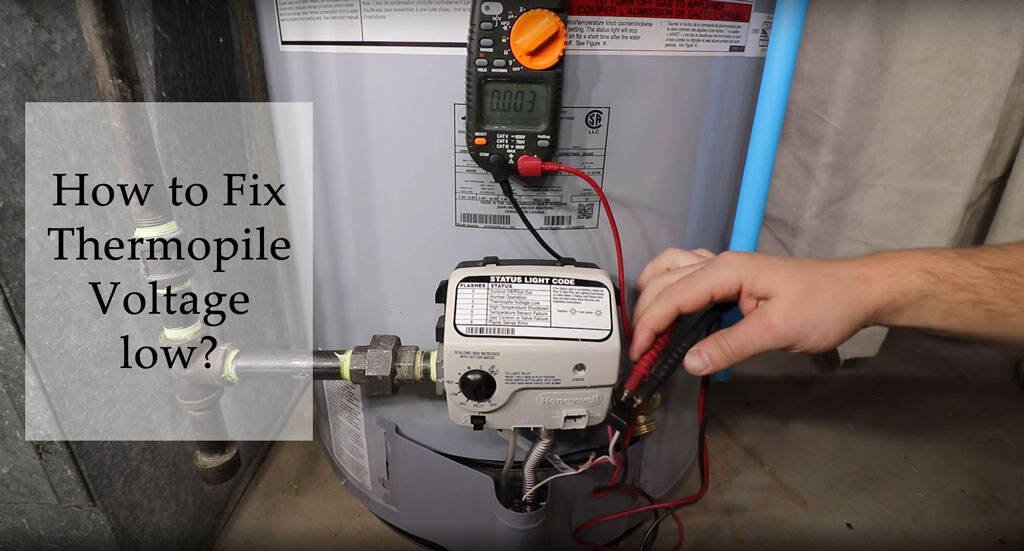
1. Test Your Thermopile
Testing a Thermopile unit is easier than you think, only if you use the right tools. So you don’t need any gas or electric work experience. Follow the steps we mentioned below.
First, bring a multimeter and set it to millivolts or less than one volt. Below the gas control, Thermopile wiring connectors are easily removed with a simple wiggle.
Here you can see multiple wires in different colors. So first, connect the red lead (positive) to the red Thermocouple wire and the black lead to the white lead.
Now light up your pilot light in the gas control. You should follow the owner’s manual to conduct the process. Every model has slightly different settings for the task. If the light is delicate, the voltage starts increasing.
You should hold down the gas control knob until the maximum voltage is reached in your Thermopile. The process may take three or more minutes. When the reading on the multimeter slows down, the process will end.
So this is an open circuit test for Thermopile. If the Thermocouple stays between 650 to 850 millivolts, it is considered a healthy unit. But if the test reads below 400 millivolts, the unit may require service or replacement.
2. Fix the Problem in Cold Junction
If your Thermopile is facing a cold junction issue, don’t worry, there is a permanent solution. A standard amplifier is the best tool for this task. This component takes the voltage different from two inputs and amplifies them.
To use this component, connect the non-inverting input to the positive terminal of the Thermocouple. In contrast, connect the amplifier inverting input to the negative terminal. The process will amplify voltage different from Thermocouple junctions.
Besides the changes, you should also ensure a few vital aspects for cold junction error. Remember, a cold environment, windy air, and extreme moisture can affect Thermopile voltage and the junction. So try to install the unit in dry and sustain temperature rooms.
Additionally, you should ensure the hot junction doesn’t pass heat flow to the cold junction. Blockage or clog in these terminals can develop the problem. So clean the unit if required.
3. Inspect Thermocouple Wire Settings
Loose, damaged, or wrong wiring is another factor that causes low voltage in Thermopile. If your system has the same issue, you will notice lower reading on the multimeter than usual. So you should determine whether the thermocouple wiring is well managed and not defective.
First, remove the Thermopile from the furnace and reinstall the unit. Later you should rearrange the wiring if required. Many people are unfamiliar with furnace settings, so contact a professional for help.
4. Replace the Faulty Thermopile
If your Thermopile has no technical errors or faulty units, a low voltage problem will be fixed. But sometimes this electric generator gets old and loses its capability to produce current. In this case, you get one option to replace the old Thermopile unit.
So first, shut off the power from your breaker box and remove the access to the panel to work inside the furnace.
Start disconnecting thermocouple wrings from its terminals. Take a wrench to remove secured bolts and pull out the Thermopile unit.
Now take the old unit to a hardware store to get a similar Thermopile unit. To install it, reverse the process we followed to remove it.
First, locate the Thermopile and adjust the unit to its correct position. Connect the wiring by following the user manual and turn on the power supply from the breaker box.
Now you should check the unit using a multimeter. This test is similar to what we mentioned previously. So ensure the voltage stays on our recommended standards.
Should I Deal With Thermopile Voltage Low?
If you follow our step-by-step troubleshooting guide, the problem will resolve quickly. Still, the problem will be different for everyone. A few minor mistakes, wring furnace setting, write adjustment, installation errors, etc can cause voltage issues in Thermopile.
So Remember, a healthy Thermocouple reading should stay between 650-850 millivolts. If you fix every possible step, replace the old unit, and are still facing the voltage issue, contact a professional.
FAQs Related to Thermopile Voltage Low
How Can You Tell if a Thermopile is Bad?
Use an adjustable multi-meter to determine the Thermopile voltage. The unit is in bad condition if the current reading is below 300-400 millivolts.
How Long Does It Take a Thermopile to Heat Up?
Generally, a thermopile takes 30-60 seconds to heat up to display a proper reading. But you should ensure the pilot valve is open, and the flame should go out when you press the start button.
How Long Does the Thermopile Last?
Generally, a Thermopile does not have a fixed lifespan. If the unit is used and maintained correctly, it can run for years or even decades.
Conclusion
We hope you get the best possible answers to your query. Remember, several factors affect Thermopile current or its voltage reading. You can ensure low voltage using a multimeter. If the low voltage stays for hours, go through our troubleshooting steps, like fixing the cold junction, testing the unit, and replacement. Professional help is only required if no fixing steps work in your favor.
Recommended Posts:


